MIG Welding for Beginners | Video with Shauno from 4WD 24/7
MIG Welding for Beginners. Learn along with Shauno to take your welding skills from zero to hero. Plus a step-by-step guide with photos.
Why MIG ?
Out of the three most common welding methods (MIG, Stick/MMA & TIG), MIG welding is by far the easiest process to master. Select the right wire, get your settings right and all you really have to do is control the torch! It's also the most effecient, because the filler metal (wire) is automatically fed into the weld, allowing the operator to weld faster and avoid having to step to "re load".
What does MIG mean ?
MIG stands for "metal inert gas", becuase inert gases such as argon are used to shield the weld and prevent oxidisation. This is also sometimes called GMAW (gas metal arc welding).
Although not technically correct, the term 'MIG' is also frequently used to describe welding with "gasless" flux-cored (FCAW) wire. This is now a very popular process, thanks to high-quality gasless MIG wires such as Platinum GL-11 that are easy to use and offer a great result. The guide below will also provide some handy tips to help you learn how to gasless MIG weld.
What materials can I weld with a MIG ?
With a MIG you can weld; mild steel, stainless steel, and aluminium. You can also weld with bronze wires, a process known as MIG brazing.
What do the dials/knobs on a MIG welder control ?
All MIG machines will have two main adjustments;
1. Volts which essentially controls heat
2. And Wire Speed which regulates how fast the wire travels out of the gun, which also regulates Amps
Getting the balance right between these two functions is critical to achieving a good weld.
Nearly all machines have seperate dials for these two parameters. Some machines, such is the FORCE 132MST, also have programs that allow the operator to specify the wire type/size and material thickness, and the machine will then automatically set volts and wire speed.
Tip: Practice on a piece of scrap material so you find the right settings and technique, before starting on the job.
How to set volts and wire speed on a MIG welder
The ideal settings will vary depending on the material/wire type, thickness, and sometimes the joint type you are trying to achieve.
Below are some common MIG welding issues, and how to adjust your settings to rectify them.
Tip: Most modern inverter welders will have “cheat sheet” on the inside of the wire feeder compartment door, with suggested settings. This is a really good starting point for beginner welders.
MIG Troubleshooting #1: Excess spatter & undercut
There's a lot of spatter, the weld seems to “undercut” the material, and the work piece glows red hot for an extended period after welding.
Solution: The weld is too hot, turn Voltage dial DOWN.
MIG Troubleshooting #2: Tall and skinny
The weld is tall, skinny and appears to be sitting on top of the material, with poor penetration.

Solution: The weld is too cold, turn Voltage dial UP.
MIG Troubleshooting #3: Flat and wide
The weld is flat, wide, and weld pool is difficult to control
Solution: The wire speed is too fast, turn Amps/Wire-Speed DOWN.
MIG Troubleshooting #4: Narrow & wobbly
The weld is very narrow and inconsistent.
Solution: Travel speed is too fast, reduce your torch travel speed.
Tip: Before pressing the trigger on the torch, do a “dry run” of where you want to weld. This will put your hands in a good position to be able to get a more consistent travel speed.
MIG Troubleshooting #5: Blow outs
The weld is bulging and/or the wire is blowing holes through the material
Solution: The travel speed is too slow, speed your hand up a little.
Tip: A quality welding machine can make a big difference. These days, there has been significant developments in inverter welder technology to help beginner welders. One key change is the introduction of an automatic welding function, where you simply select dial up the thickness of the material and the machine automatically sets the parameters for you!
MIG Wire Feeding Issues
There a number of factors to get right, to ensure successful wire feeding. Head on over to our wire feed troubleshooting guide, for tips on this topic.
Optimum MIG Torch/Gun Angle
Another common mistake is the incorrect torch angle.
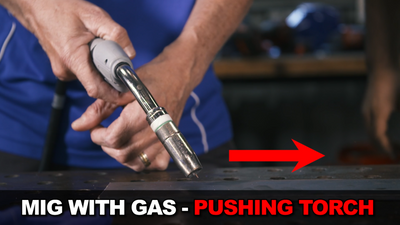
If welding with gas (solid wire), point the torch perpendicular to the weld, then lean 10-15 degrees away from the intended travel direction and point / push the torch in the direction of travel.
If welding with gasless or flux-cored wire, lean the torch 10-15 degrees into the travel direction and drag the torch.

Tip: Here's a handy saying to help you remember whether to push or pull the torch; “When there’s slag, you drag”. Gasless/flux-cored wires produce a slag, solid/gas wires don't.
Getting the Polarity right on a MIG welder
We've all done it... cursed the welding machine only to find out that the polarity is the wrong way around.
There's a quick hack to make sure you get polarity right:
For the polarity of your Torch, just remember;
With Gas = Positive (solid wires)
No Gas = Negative (gasless wire)
Once you have connected your torch polarity correctly, then just connect the earth lead into the remaining, or opposite, socket/terminal.

Tip: For the majority of machines, the polarity lead for the torch will be located on the front of the machine, you simply plug this into the correct socket, and then the earth lead will connect to the alternate one. However, on some other machines the torch polarity cable may be inside the wire feeder compartment.
Earth and Connections: Super important!
When you’re welding, you are completing a circuit, so it’s massively important that every part of that circuit is working as it should... otherwise your ability to produce a great weld will be compromised.
In the case of MIG welding, the circuit inludes; Torch & cable, torch polarity, earth lead & of course the internal components in the welder itself.
If one part of this circuit is faulty or in poor condition, this will result in current loss and will restrict the performance of your welder - it's like trying to use a garden hose that has a leak.
Here's some common issues that you need to watch out for;
- Cable twist-lock connectors not firmly connected
- Earth clamp worn or damaged (components loose, weak spring, etc)
- Poor connection between earth cable & earth clamp (loose cable lug, not all copper wires connected, loose nut on terminal bolt, etc)
- Earth or Torch cable in poor condition: worn insulation, exposed wires, etc
- Torch not firmly screwed into front of the machine (on machines with 'Euro' connection)
Tip: Torch polarity cable connectors can often come loose without the operator being aware. To prevent this, disconnect the cable & put a 'twist' in it, in the direction that will keep the connector tight, then re-connect.
Here's a great video which explain more on this topic:
Other MIG Welding Tips & Tricks
Preparation
Preparation, as always, is key! Thankfully, MIG welding is pretty forgiving, but you will always achieve a better result by cleaning off any rust, paint and scale etc.
A cup brush is a great weapon of choice to clean metals prior to welding.
MIG Aluminium
Welding aluminium is a whole different ball game, so we’ve developed a special guide just for that. Check out How to set up your MIG welder for Aluminium welding.
Nozzle dip gel
Nozzle dip gel is a great way to keep your nozzle clean from welding spatter, and it can extend the life of your consumables too.
Safety
Safety first, always! There is a range of safety gear that will not only help you weld safely but also help you perform your job a lot better too.
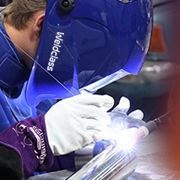
1. A decent quality welding helmet is a must have, despite protecting your eyes, a good helmet with enhanced colour recognition technology will certainly enhance your ability to see the weld pool properly, and ultimately enhance your welding experience. PAPR welding helmets are also availble for protection against harmful welding fumes.
2. Welding gloves – we’ve all done, “nah she’ll be right, it’s only a short weld!” Trust me, a decent pair of welding gloves will allow you to put your hands in a more comfortable and steady position.
3. An old long-sleeved shirt is better than nothing, but to save lighting yourself up (which, I’m told can be uncomfortable), get yourself a decent quality welding jacket.
Hopefully these simple tips assist you with nailing down your MIG welding technique. Above everything else though, the best way to learn how to weld is by simply giving it a go. So, good luck laying down those beads, and all the very best!
-
My first project will be a new front sliding gate for security and to keep the dog in, as well as making my partner happy. I would love to have the Italian made 210 :-).Date: 12-04-2023Mark Sharrad -
thanks for explaining the basics so that a beginner can understandDate: 25-01-2023Tom Browne Browne Small engine -
The first FYI job I would do will be to make a mini smoker out off 2 9kg gas bottlesDate: 28-02-2022Josh Reynolds -
A welder like we have seen here would make the job of welding up a “gypsy” trailer for trailering cars around, so much easier.Date: 07-10-2021Russell -
Great educational DEMO. I am an old stick man, so this has been very enlightening.I currently have a 57 chev pick up project in front of me, looks like a MIG will be the answer for replacing floorpans and small rusted areas, that would be next on the list for a new Weldclass MIG welder.Date: 07-10-2021Mark Lane -
I would make a massive bird aviary so I can keep a couple of parrotsDate: 06-10-2021Guido Cabinet maker -
My first job is a orchid house frame ( spouse pacifier ) which has to fit in a corner of the block which is sadly deficient in right angles. 4mm mesh benches also are in the requirement.Date: 06-10-2021Gary Hollands -
The first thing I would like to weld would be a table to mount my wood splitter on so I don't have to bend down so much.Date: 06-10-2021john weaver -
I'd love to build a pair of ramps a meter high for cleaning underneath my 4WD after being out in the bush.Date: 06-10-2021Peter Chalmers -
My first project will be to weld my ride on mower deck that is buggered and the welder will be perfect as the deck is only about 1mm thick, thanks Shaun.Date: 05-10-2021Eksteen Le Roux Home handyman -
That looks like a really cool welder. I've only ever used a stick welder (ark welder) and have always thought about getting myself a mig welder, just never known what to get. Any way my next project would be to make up a new boat trailer for my boat out of 5mm 50x50 stainless angle. I think a welder like that one would make me look a better welder than what I really am. CheersDate: 05-10-2021David -
First project would be Corten retaining wall and steps.Date: 05-10-2021Matthew Rieniets -
Great demo. I shall make the missus a fire pit with a BBQ top so I can cook the xmas lunch without smoking out the house...she will love it.Date: 05-10-2021Donald Firth


